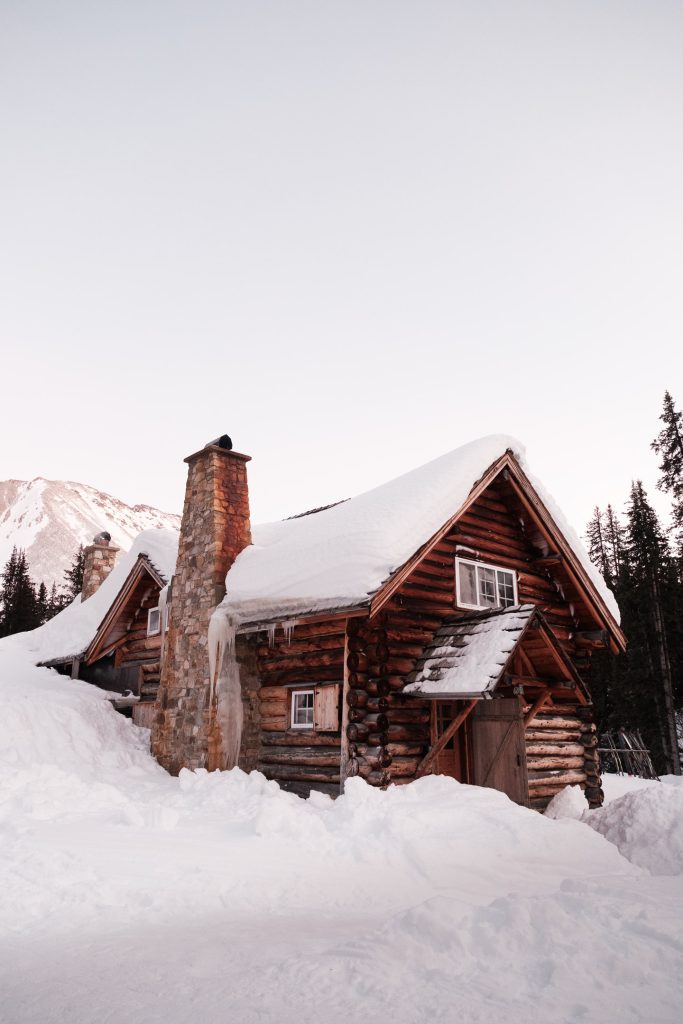
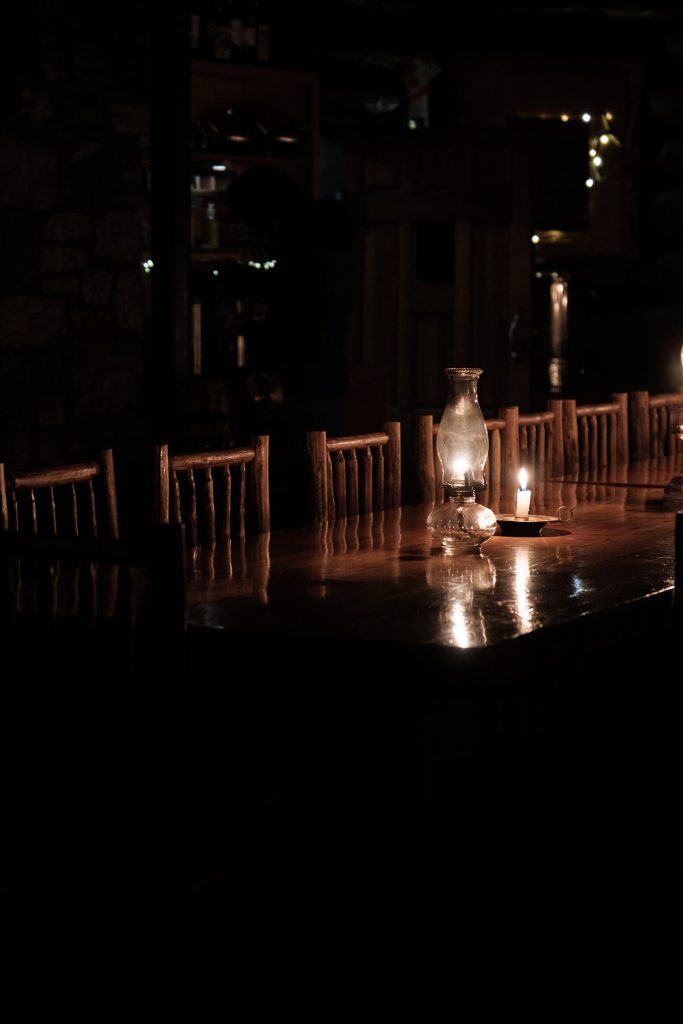
Staying at Skoki Lodge in winter is the ultimate treat. It’s a unique place that you rarely come across in Canada. It’s rustic, it has character and it’s incredibly cosy. A log cabin of dreams. Tucked away in a remote valley in the backcountry of Banff National Park, the only way to reach it is by an 11km trail and the only lighting once at the lodge is from oil lamps and candlelight. If that sounds like your idea of heaven then you’ll want to keep reading.
In this guide we’ve covered everything you need to know for a winter visit to Skoki Lodge, including how to get there, planning for the trip, what to bring and what to expect.
History of Skoki Lodge
Skoki Lodge was the first cabin to specifically cater to ski-tourists in Canada. It was built between 1930-1931 by a group of Banff residents who formed the Ski Club of the Canadian Rockies and it has been welcoming skiers ever since. The log cabin has had a few renovations and additions over the years including smaller cabins which are used in addition to the main lodge to sleep guests.
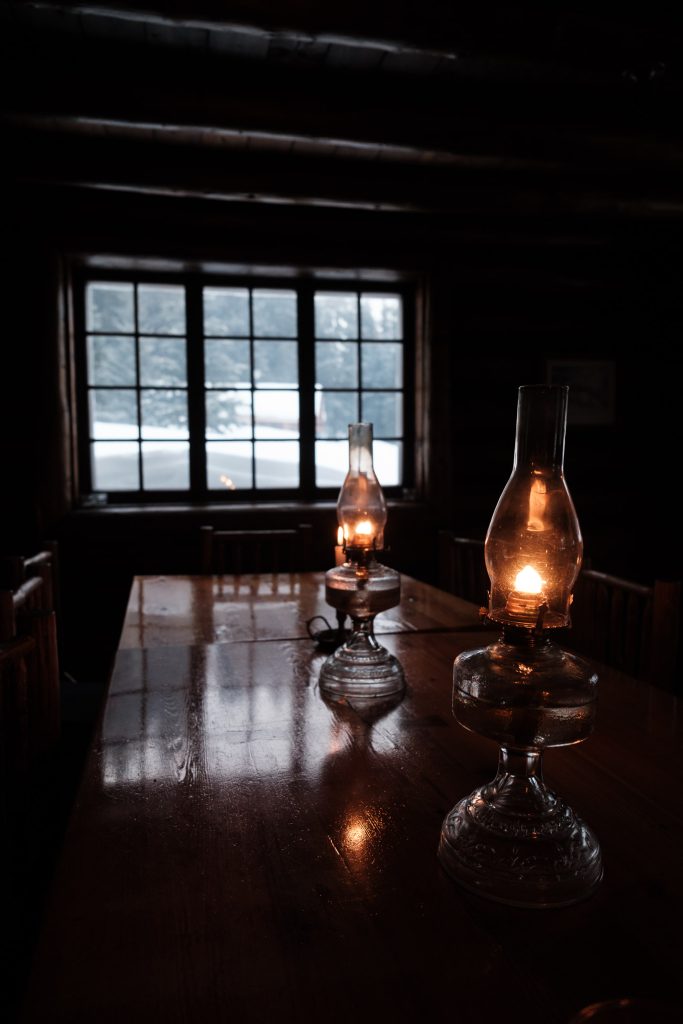
Skoki is a reminder of a simpler and slower way of life. No electricity, no running water and no wifi! It’s an opportunity to connect with nature and with people.
Why visit Skoki Lodge in winter
Does this really need an explanation? Quite simply it is the perfect winter experience. Imagine turning up to a snow covered log cabin after an 11km ski in – smoke streaming from the chimney, candles glowing in the windows, surrounded by frosty trees and towering mountains with only the sound of nature. There’s no other backcountry lodge like it.
While the lodge itself is the main draw, the adventure to get there and back also forms a huge part of the experience. The trail is 11km each way and rises 470m on the way there and 320m on the way back. Guests will traverse a frozen lake and a mountain pass, all while having views, views, views.
Skoki Lodge experience
Sleeping arrangements:
The main lodge has 5 bedrooms, each with a varying number of beds, plus 3 additional log cabins which offer more privacy. More info on the room configurations here. You book out the entire room or cabin when making a reservation, so even if there are 3 beds in your room and only 2 of you, there won’t be anyone else sharing with you.
Most guests stay 2 nights, but if you are tight on time, there is an option to stay one at a higher cost.
The rooms are cosy and come with a mirror, wash bowl and hot water in a thermos. There is an additional wash bowl and hot water at the end of the corridor in the main lodge. There is no running water throughout the lodge or cabins. Towels and linens are provided including warm duvets so you won’t get cold during the night.
The walls in the main lodge are very thin so that does mean you hear absolutely everything from your neighbours and downstairs in the communal area. Bring ear plugs and you’ll be fine.
Facilities:
Facilities are basic and limited at Skoki, but that’s all part of its charm. As mentioned, there is no electricity, running water or wifi. Hot water is provided in a thermos in each room and light is from oil lamps, candles and battery operated lamps in the bedrooms. There are no showers and the only toilets are 2 outhouses shared by everyone.
Food:
Skoki is fully catered for, meaning all food, tea, coffee, water is also included in your stay (except for alcohol which you can buy whilst there). On your arrival and every afternoon you will be offered soup and a charcuterie board with an assortment of cheese, meats, fruit and pickles. Dinner is a 3-course communal affair, where everyone sits around the dining table. Similarly, everyone sits for a hearty breakfast in the morning. Lunch is made up of a sandwich and snacks which you can take with you if you plan on being out for the day. They also provide you with lunch for the trek back to Lake Louise. The staff can accommodate for food preferences and allergies as long as they have been notified in advance of your stay.
How to get to Skoki Lodge in winter and what to expect along the trail
The closest community to Skoki Lodge is Lake Louise and the trail begins at the Lake Louise Ski Resort.
The resort allows one vehicle per group to park in the VIP parking area. If additional members of your group plan to drive separately, extra vehicles will need to be parked down the road at the Skoki Lodge parking area and then take a shuttle back to the ski resort.
You are required to check in at the resort at 9am on the morning of your booking. After checking in you can make your way to the trailhead. As part of your booking, you’ll be issued a lift pass to get to the trailhead. You’ll take the Grizzly Gondola up and then either ski down the green Pika Run to Temple Lodge, or if you don’t want to ski down, you can take the Ptarmigan Chairlift down. The trailhead is located near Temple Lodge, slightly up Marmot Run on the left-hand side.
Depending on your ability, it takes approximately 3-5 hours to travel from the trailhead to Skoki Lodge.
Trail route:
The route to Skoki Lodge is well marked with yellow flags and/or red poles along the entire trail. It begins by winding through trees with a gentle incline before opening into a wide meadow as you travel alongside the Lake Louise Ski Resort and the newly opened Richardson’s Ridge area.
As you cross the meadow, you’ll see the Halfway Hut on your left. Despite its name, you’ll reach it much sooner than expected. This is because the hut is located halfway between Skoki Lodge and the Lake Louise parking area, not the trailhead itself. The hut also sits slightly off the main trail, so you’ll need to take a short detour if you plan to stop there.
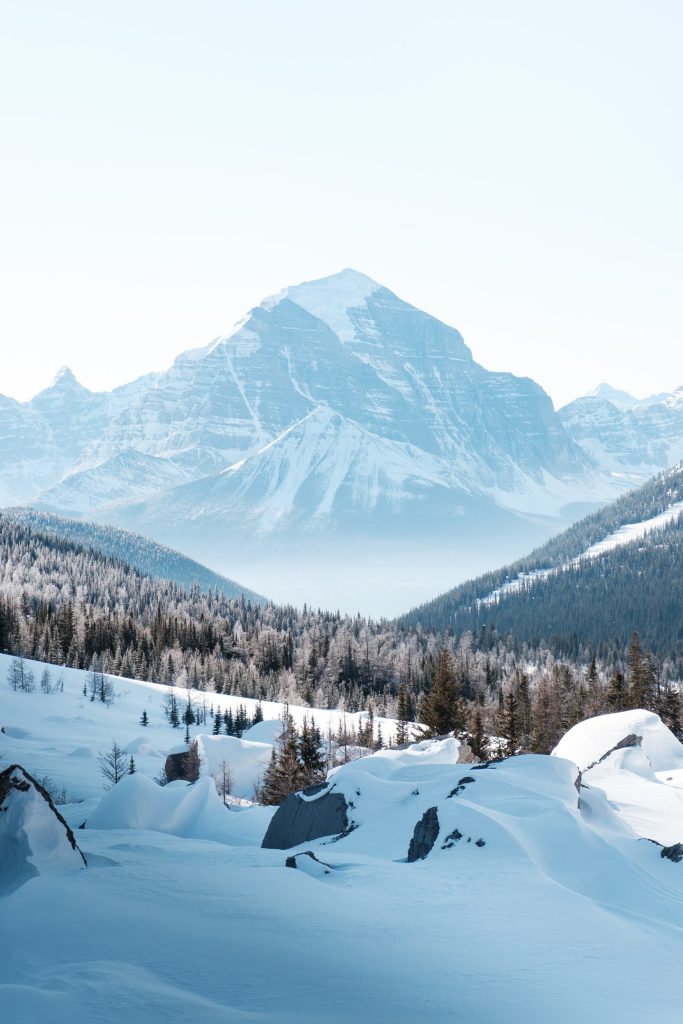
The meadow is relatively flat, with a few gentle ups and downs. As the trail re-enters the trees, the incline gradually increases on the approach to Boulder Pass. It sounds more daunting than it actually is and the climb is manageable rather than a steep ascent. At the top of Boulder Pass, you’re rewarded with your first views beyond the ski resort as the landscape opens to reveal frozen Ptarmigan Lake, surrounding peaks and Deception Pass in the distance.
Crossing the wide, open lake offers a true sense of the scale and remoteness of Banff National Park, far beyond what most visitors experience. Surrounded by Ptarmigan Peak and Redoubt Mountain, you can’t help but feel small in this vast alpine environment.
Once across the lake, the trail climbs toward Deception Pass. From below, the ascent doesn’t appear particularly intimidating, and it was less steep and shorter than expected. That said, it’s still a bit of a slog to the top, though those with alpine touring experience will likely find it a breeze.
At the top of Deception Pass, new views unfold, and the valley below is where Skoki Lodge is located. Another thing that we weren’t quite expecting is that the descent isn’t an immediate open downhill. Instead, the trail begins with a gentle traverse and slight decline, flattens out, climbs briefly again, and then finally descends along a narrow, tree-lined trail that leads to the lodge.
All of this naturally raises some important questions: How challenging is the route? How fit do you need to be? How much experience is required? And what equipment is best suited for the journey to Skoki Lodge?
Physical fitness/skill requirements for visiting Skoki Lodge in winter
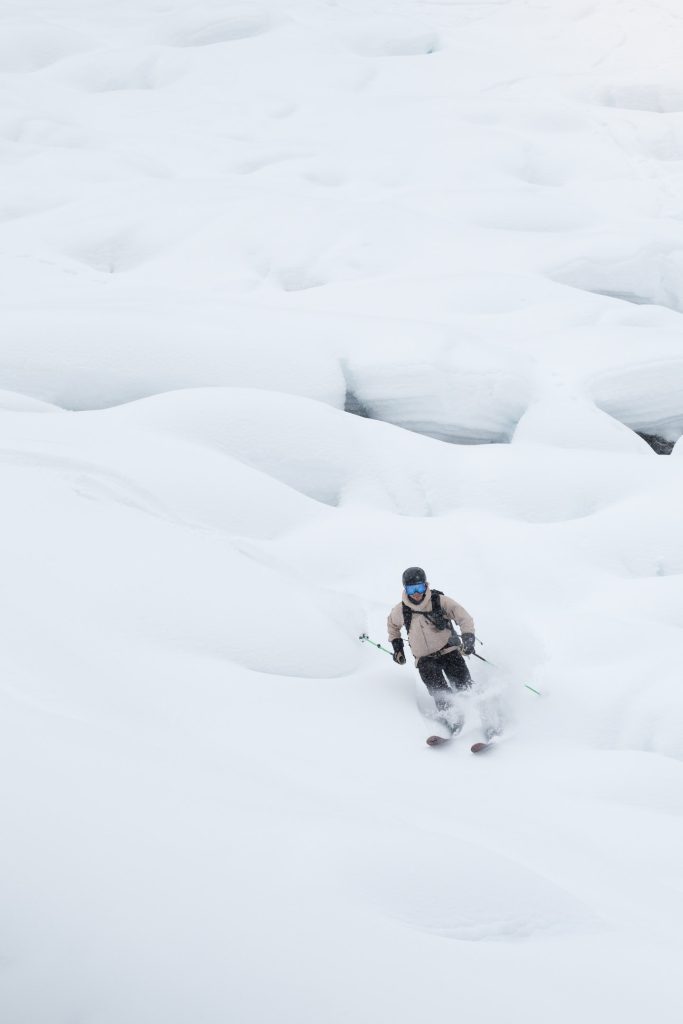
The trail is rated as intermediate, so you should be at least an intermediate skier or splitboarder and have some degree of fitness to make it up the inclines. The trail leads through simple terrain, and yes you probably wouldn’t make it if you were an absolute beginner, but from our perspective it is fairly accessible to most people. BUT it is tiring. We are active people, yet by the end of the trip on our way out, we were absolutely exhausted.
Cross-country skis, alpine touring skis, splitboard, snowshoes – which is right for you?
The type of equipment best suited for the trip to Skoki Lodge largely depends on your previous experience and what you plan to do while staying at the lodge (read on for more information about activities during your lodge stay). Rather than prescribing a single best option, the following are practical reflections based on what we observed and experienced on the route.
Cross-country skis:
Based on our research before the trip and what we saw during our time at Skoki Lodge, the journey felt more like a cross country skiing experience. than a traditional alpine touring objective. That said, it’s best suited for experienced cross-country skiers. The route is not track set and there are several steeper climbs and descents that require confidence and control.
Because the trail follows a well-established, well-trodden route and features relatively limited downhill terrain, cross-country skis are a solid choice for covering the long distance efficiently. For skiers comfortable managing variable terrain with our set tracks, this setup can feel ideal.
Alpine touring skis:
Alpine touring skis are also a perfectly acceptable option, and many people choose them for the trip to Skoki Lodge. There are several sections along the route where you’ll remove skins and the terrain around the lodge itself offers opportunities to get some turns in.
On the way to the lodge, you can transition at the top of Deception Pass and ski all the way down to Skoki lodge without needing to skin again. We did notice two separate groups (who had likey been to the lodge before) choosing to transition slightly below the top of Deception Pass near the treeline. This is likely because there’s a short uphill section after the pass before reaching the trees.
On the return journey toward Lake Louise, you can again transition at the top of Deception Pass for a slightly steeper, though relatively short, ski descent. After that you’ll need to skin up once more. Once you reach the top of Boulder Pass, you can transition and ski all the way back to the trailhead at Lake Louise Ski Resort. The trail does flatten out and include short inclines, so this option depends on how comfortable you feel skiing these sections without skins.
Splitboard:
Similar to alpine touring skis, a splitboard is a viable option, particularly if you plan to seek out turns during your stay at the lodge. However, there are a few additional considerations for splitboarders.
The descent from the top of Deception Pass to the lodge is more challenging on a snowboard. We recommend staying in ski mode until you reach the treeline below Deception Pass, as there is a slight uphill section before the trees. Once you’re past this point, transitioning to snowboard mode makes more sense. As you approach the lodge, the trail flattens and includes several small rolls and bumps, which may require you to unstrap and walk the final section.
On the return trip toward Lake Louise, you can transition to snowboard mode at the top of Deception Pass for a slightly steeper but fairly short descent. However, we wouldn’t recommend transitioning at the top of Boulder Pass, as the downhill there is short and narrow and would require you to switch back to skis shortly after.
Snowshoes:
Snowshoes are a great alternative for reaching Skoki Lodge if you don’t want to ski or splitboard. They offer a straightforward and accessible option for those who are comfortable with long days in winter terrain but prefer to stay on foot.
Activities at Skoki Lodge in winter
Most guests choose to stay at Skoki Lodge for 2 nights, which provides the perfect balance between travel time and the opportunity to truly enjoy the remote alpine setting. A 2-night stay allows for a full day to slow down – whether that means relaxing at the lodge with a book or a board game, or getting cosy by the lodge’s fireplace.
For those keen to explore, there are several trails surrounding Skoki Lodge that offer easy access to the surrounding landscape. One popular outing is a trip down to Merlin Meadows, where you’ll be rewarded with expansive views and a peaceful alpine atmosphere. If you’re looking to go a bit farther, Lake Merlin is well Wirth the extra effort and offers particularly stunning scenery.
If you’re visiting on alpine touring skis or a splitboard, there are also nearby options to find some turns. We headed to an area called ‘pillows’ and ‘duvet’ at the far end of Merlin Meadows. The lodge staff are an excellent resource and are always happy to provide advice on where to go based on current conditions and experience level.
Safety considerations
Avalanche conditions:
The 11km route in and out passes through simple terrain where the avalanche risk is low. You do not need to have avalanche training or gear to stay here, but it’s still the backcountry and essential to be aware of your surroundings. Avalanche conditions can be found here. If you plan to go touring while your staying at the lodge then you should bring avalanche gear with you.
Weather planning:
Check the weather conditions before you leave so you know what to bring and what to expect. It can get very cold (we were there during a cold snap and the temperature plummeted to -30C). It also tends to get very windy between Boulder Pass and the top of Deception Pass so make sure to bring a face covering. The trail is well marked with yellow flags and/or red poles, but in the case of bad visibility, make sure you have the trail map downloaded before you set out. Each morning after breakfast at the lodge, the staff provide weather forecast for the day.
Gear checklist/packing list for Skoki Lodge in winter
Here’s everything we brought with us for a 2 night stay:
Clothes:
- Thermal top and bottoms
- Lightweight fleece
- Lightweight or midweight down
- Ski jacket
- Ski pants
- Thick balaclava
- 2 x ski socks
- Spare socks (optional if you want to change into a fresh pair at the lodge)
- Underwear for 3 days
- Spare top and leggings (optional if you want something other than your thermals to wear at the lodge)
- PJs
- Hut booties
- 2x wooley or fleece hats
Ski gear:
- Inner gloves
- Ski mittens
- Helmet
- Goggles
- Ski boots
- Skis/splitboard/snowshoes
- Skins
- Poles with baskets
- Mini screw driver (for skis/splitboard)
- Scraper (for splitboard)
- Avalanche beacon (optional)
- Avalanche shovel (optional)
- Avalanche probe (optional)
Other:
- Handwarmers/toewarmers
- First aid kit
- Whistle
- Bear spray (even in winter, you never know)
- Headtorch
- Spare batteries (optional)
- Battery pack (to charge phone)
- Camera (optional)
- Camera battery (optional)
- Phone
- Cash
- Card
- ID
- Car keys
- Toiletries e.g., toothbrush
- Hand sanitizer
- Earplugs (they do have some at the lodge if you don’t have your own)
- Eye mask (it’s actually very dark, so this was not needed)
- Sunglasses
Food:
- Snacks and/or sandwich for trek in
If you have any questions about planning this trip, feel free to drop a comment below. We’d love to help you craft the perfect itinerary.