This guide covers everything you need to know for a self-guided hike on one of the best multi-day backpacking routes in Canada – the Rockwall Trail in Kootenay National Park.
Below you’ll find detailed information about the route, campgrounds, what to pack, logistics, how to get a permit, recommended itineraries and plenty of photos so you know what to expect.
Important: Rockwall Trail campground reservations open on Monday, January 26, 2026 at 8:00 a.m. MST.
What is the Rockwall Trail?
The Rockwall Trail is a multi-day backpacking route that traverses dramatic alpine terrain deep within the backcountry of Kootenay National Park, in the heart of the Canadian Rockies. The trail follows a massive limestone escarpment called the Rockwall. In some sections, the cliff towers more than 900m (2,953ft) straight above the trail.
Often described as one of the most spectacular hikes in the Canadian Rockies, thanks to beautiful alpine passes, hanging glaciers, wildflower meadows, glacier-fed lakes and waterfalls. On top of this, you really do feel like you’re in the remote wilderness as there is minimal road access. You’ll also pass one of the most beautiful lakes in the Canadian Rockies, Floe Lake and you’ll walk along a section of the Great Divide Trail (GDT).
Key details
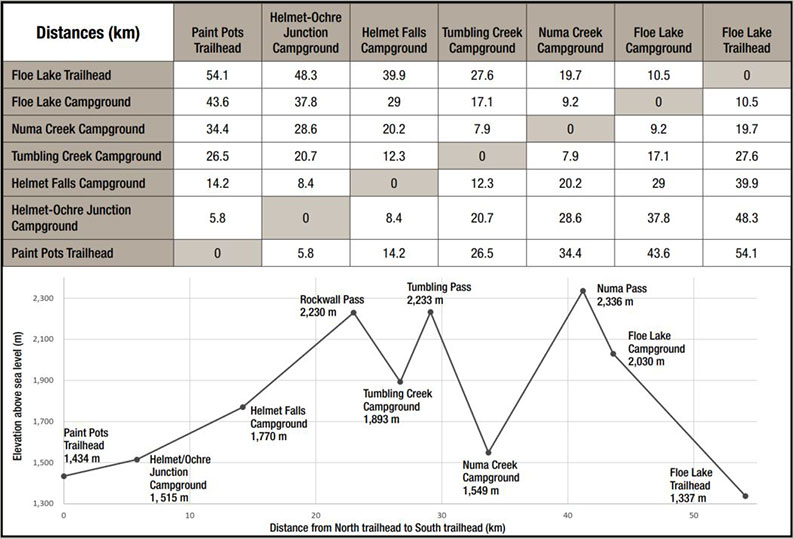
- Length: The full route is about 54–55 km (34 miles) one-way.
- Elevation gain: Approximately 3,400 m total gain / 3,500 m loss over the full route, depending on direction.
- Typical time: Most hikers plan 3–5 days to complete the full trail. Some sections are possible as day hikes for strong hikers or trail runners.
- Access/Trailheads:
- North access: via the Paint Pots parking lot (along Highway 93 South).
- South access: via the Floe Lake Trailhead.
- Alternate access: Numa Creek and Tumbling Creek.
- Permit: A backcountry permit (or in other words, a camping reservation) is mandatory for anyone planning an overnight trip in the backcountry of Kootenay National Park for July, August and September. Campers must have a copy of the permit (paper or a screen shot). We’ve outlined everything you need to know about getting a permit further in this guide.
- Difficulty: This is a challenging route, with lots of elevation gain, remote terrain, bear country and unpredictable weather.

When is the best time to hike the Rockwall Trail?
Mid-July to early October is generally considered the best time to hike the trail as snow can cover the alpine passes well into July and then again from October. However, this varies from year to year and campgrounds along the trail can be booked from late June with the exception of Floe Lake Campground which typically doesn’t open until the second week in July (in 2025 bookings were available from 10th July).
We hiked the trail outside of the recommended period in early July (4-7th) and encountered minor snow patches along the high passes but nothing impassable.
Our advice: aim for mid-July through to October, but if the only available permits fall slightly earlier or later, book them – conditions may still be perfectly fine. That’s what we did.
Rockwall Trail route and sections
The Rockwall Trail weaves through forested valleys, before climbing into broad sub-alpine and alpine meadows. You’ll traverse three high passes (Rockwall Pass, Tumbling Pass and Numa Pass), walk beneath towering limestone cliffs and finish at one of the most beautiful lakes in the Rockies: Floe Lake.
Although the trail can be hiked in either direction, we strongly recommend starting at Paint Pots and ending at Floe Lake. Reasons:
- Stating at Floe Lake requires a huge ascent with a full pack. Very challenging for Day 1.
- Ending at Floe Lake feels far more rewarding.
- Finishing at Paint Pots may feel anticlimactic as much of the day is spent hiking through forest.
The trail covers a distance of 54–55 km (34 miles) one-way and an elevation gain of approximately 3,400 m total gain / 3,500 m loss over the full route, depending on direction. The table below shows the distances and elevation of campgrounds along the Rockwall Trail.
Trail sections:
Starting at Paint Pots, the trail can be divided into the following sections:
1.Paint Pots Trailhead to Helmet/Ochre Junction Campground
Distance: approx 5.8km | Elevation gain approx. 235m.
From the Paint Pots Trailhead, the trail crosses a bridge over the turquoise Vermillion River, then follows a boardwalk past bright ochre mineral springs. It continues gently through dense forest until opening onto a riverbed where the first campground, Helmet/Ochre Junction, sits. This section was fairly easy, perfect to start us off, though we encountered a lot of bear scat which kept us on edge.

2. Helmet/Ochre Junction Campground to Helmet Falls Campground
Distance: approx 8.4 km | Elevation gain approx. 120m.
From Helmet/Ochre Campground the trail returns into forest, passing avalanche chutes before climbing steadily via several switchbacks. This was a little challenging for the first day when our bags were the heaviest. You’ll catch a few glimpses of the river below and surrounding mountains. Later down the trail, you’ll cross a suspension bridge and once you near Helmet Falls campground, you’ll pass through shrubby meadows . We’ve included more details about this campground including pictures further in the guide. Helmet Falls, one of the tallest waterfalls in the Rockies, is visible from camp and can be reached via another 3km additional trail.
3. Helmet Falls Campground to Tumbling Creek Campground via Rockwall Pass
Distance: 12.3 km | Elevation gain approx. 719m.
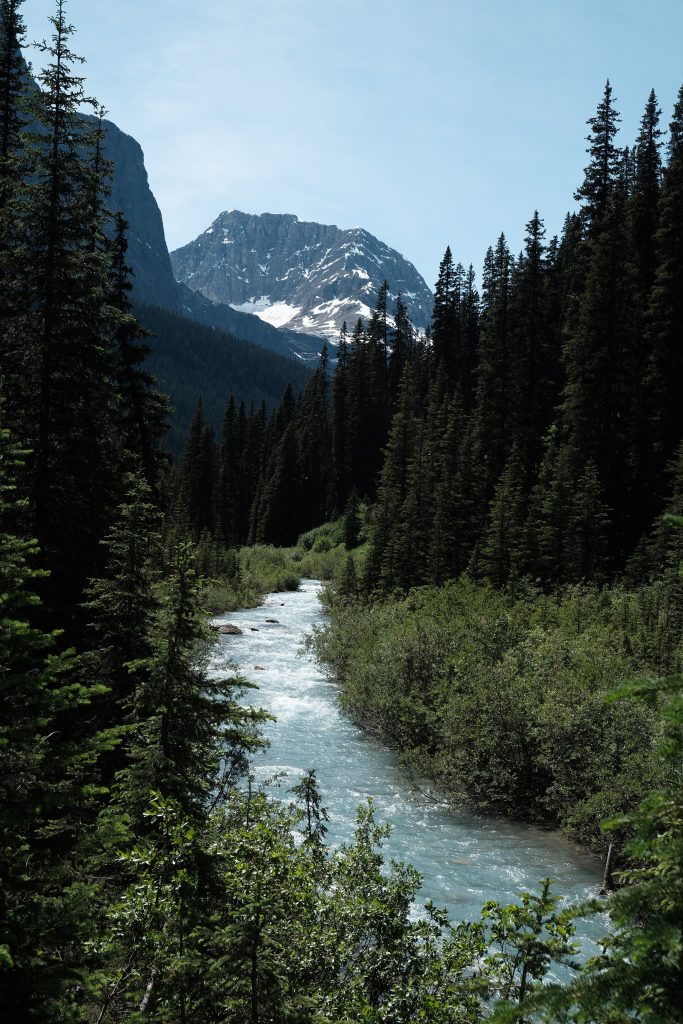
From the campground the trail ascends up to the Rockwall Pass. The trail starts off with views over to Helmet Falls. You’ll then enter a section of forest as you continue to ascend. After a while the forest will open up to alpine meadows, revealing your first commanding view of the towering limestone escarpment ‘the Rockwall’.
The trail continues along the pass as you ascend and descend rolling meadows. We encountered a few snow patches along the pass (early July) but nothing that we couldn’t navigate. Along the pass you’ll see Tumbling Glacier in the distance. This section of the trail is part of the Great Divide Trail.
You’ll reach a turning to Wolverine Pass on your right, but the trail continues straight. It then begins to descend steeply through forest to Tumbling Creek Campground. Again, we’ve included more details about this campground including pictures further in the guide.


4. Tumbling Creek Campground to Numa Creek Campground via Tumbling Pass
Distance: approx 7.9 km | Elevation gain approx. 393m.
From the campground the trail leads over a wooden bridge and then steeply ascends to Tumbling Pass, with open views of Tumbling Glacier. The trail leads through meadows with panoramic views of the pass. Meadows give way to a long descent that includes creek and snow-bridge crossings. The creeks were fairly small and shallow when we passed in early July so we only got minimally wet, but they can become wider and deeper depending on snow melt conditions. The final stretch descends through dense, overgrown brush before reaching camp.


5. Numa Creek Campground to Floe Lake Campground via Numa Pass
Distance: approx 9.2 km | Elevation gain approx. 815m.
This is one of the toughest sections of the entire trail: a long, steep ascent from the valley floor to the highest point on the Rockwall Trail: Numa Pass (2, 336m).
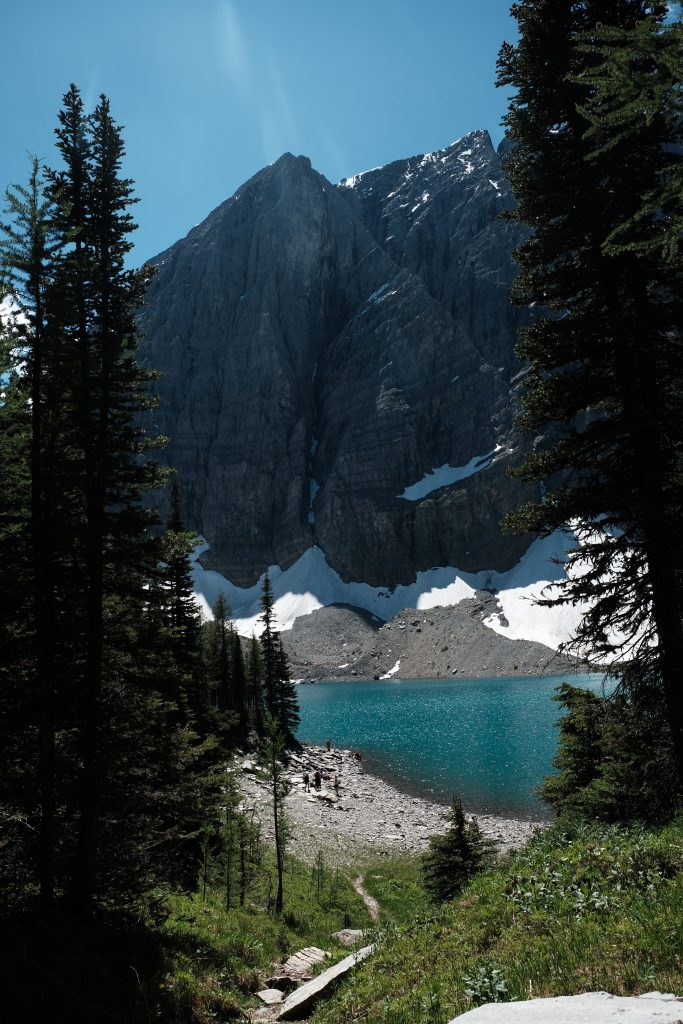
The trail first climbs steadily, passing through trees and beautiful, flower-filled meadows with a view looking up to the towering mountains. The trail then climbs steeply through forest with several switchbacks and views out to the valley below before reaching the open, and often windswept top of the pass. We encountered some snow patches up here, but again it was nothing we couldn’t pass through. From here, the descent offers jaw dropping views of Floe Lake’s turquoise water framed by alpine meadows and vertical limestone cliffs.


6. Floe Lake Campground to Floe Lake Trailhead
Distance: approx 10.5km | Elevation loss approx 693m.
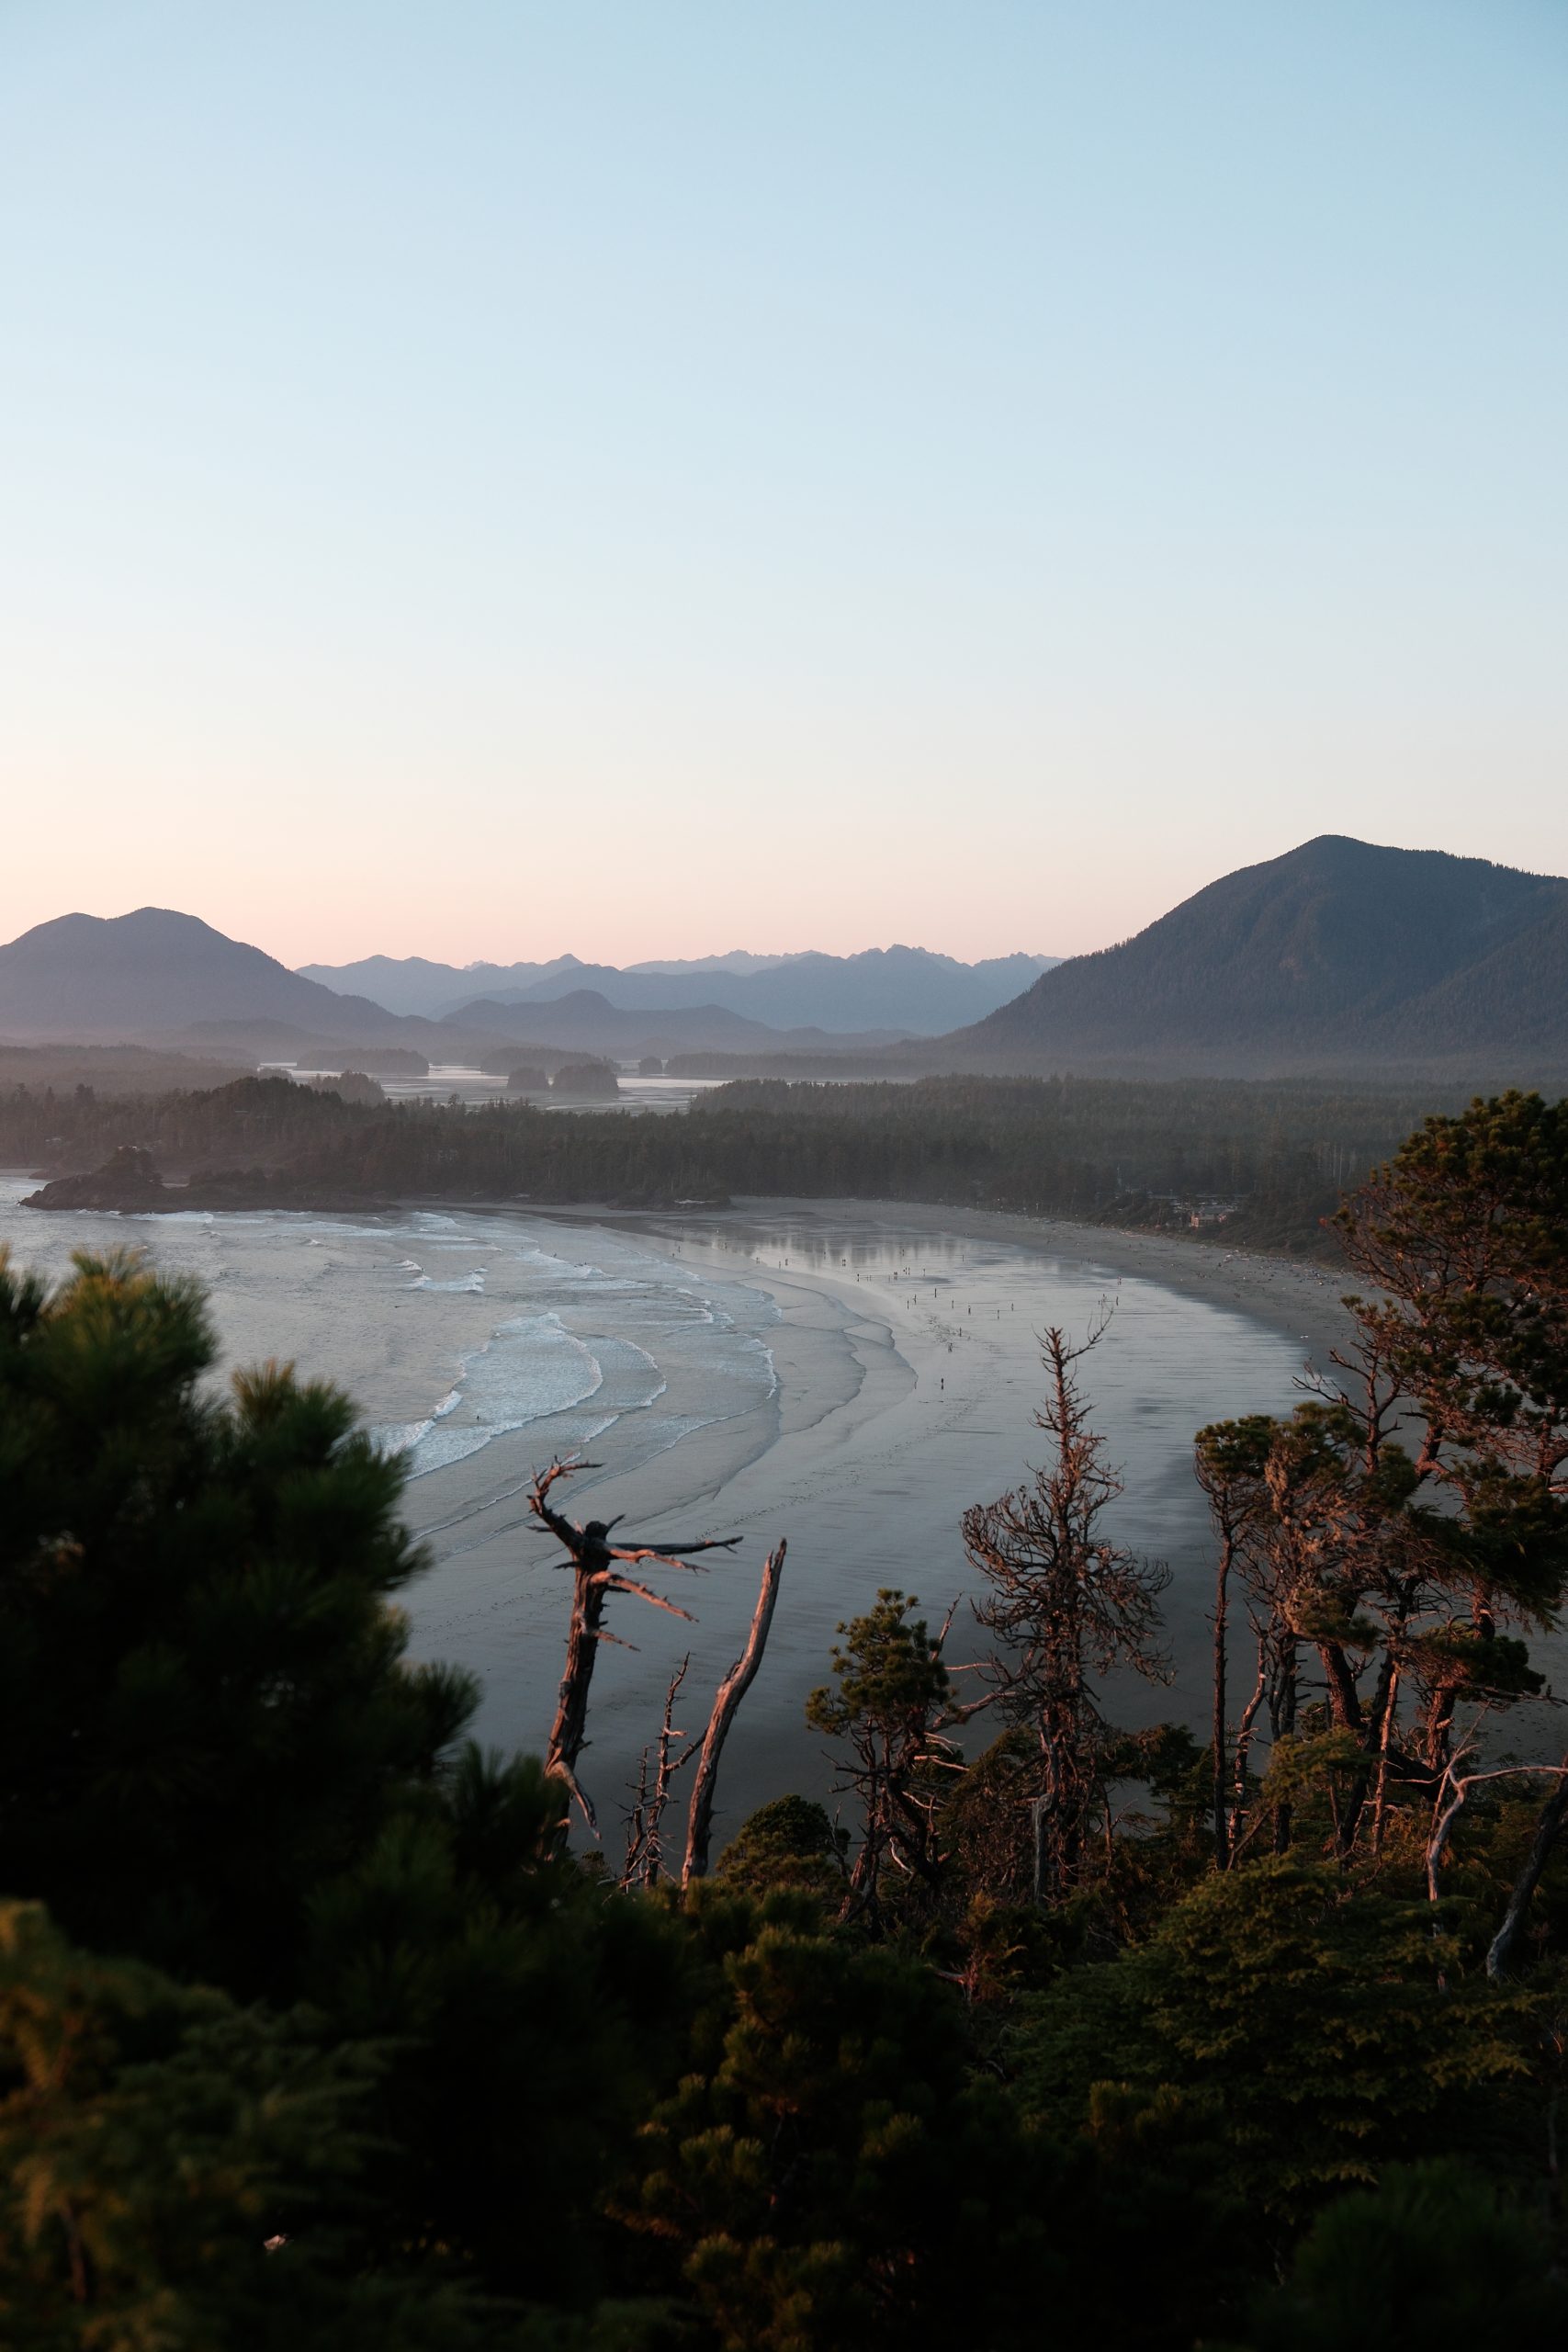
Floe Lake is breathtaking. A glacial-fed, turquoise alpine lake enclosed by sheer towering limestone cliffs and surrounded by rugged peaks. It is one of the prettiest lakes in the Rockies, rivalling Moraine or Peyto. Because it’s a challenging 10km hike from the road, it sees far fewer visitors than its more popular lake neighbours.
Being glacial-fed and at an elevation of 2,050m, the water is freezing. Still, many people decide to take a dip. Certainly a reward after a multi-day hike.
The descent to the trailhead (and end of the Rockwall Trail) is steep at first with several switchbacks leading through a forested area. It then transitions into a vast wildfire burn zone, which means no shade on hot days. The trail passes small creeks and as you near the trail head you will once again cross the Vermillion River.


Additional access points
- Tumbling Creek → Paint Pots: ~9.7 km
- Numa Creek → Numa Falls Trailhead: ~6.4 km
These can be used to shorten the route or exit during emergencies.
Campgrounds along the Rockwall Trail
The campgrounds along the Rockwall Trail are beautiful. Situated in valleys alongside creeks with views of the surrounding mountains, glaciers and waterfalls. A few things to know about the campgrounds:
- A backcountry permit (campground reservation) is required for all of them. More on how to acquire a permit below.
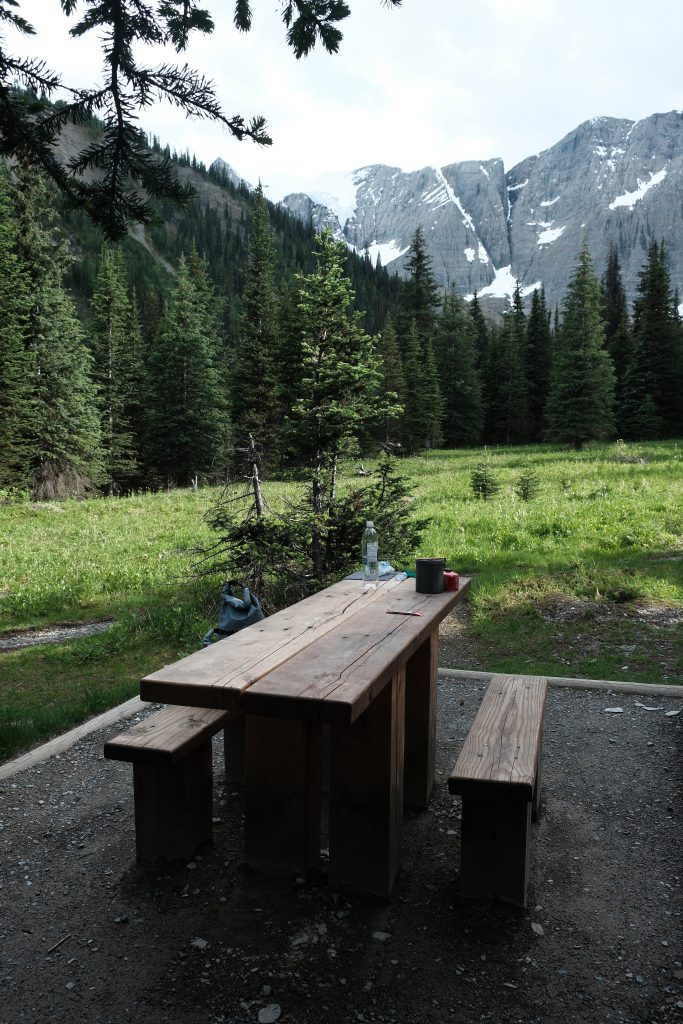
- All have outhouses, picnic benches and bear lockers to store food and toiletries, so you do not need to use bear canisters or bags.
- One tent is permitted per tent pad.
- Campfires are not permitted.
Helmet/Ochre Junction Campground
The campground lies just under 6km from the Paint Pots Trailhead and is the first campground you reach along the Rockwall Trail (starting at Paint Pots). The site is located beside Ochre Creek for easy water access. Tent pads are framed gravel and seemed to have little privacy due to sparse vegetation. Amenities include: outhouses, a cooking area with picnic benches and bear lockers.
Helmet Falls Campground
The campground likes 5.8km from Helmet/Ochre Campground or 14.2km from Paint Pots Trailhead. It’s often used for the first night along the Rockwall Trail. The campground sits in a beautiful valley basin, surrounded by an amphitheatre of rock walls and peaks. From the campground you can see Helmet Falls (waterfall) cascading down Helmet Mountain. An additional 3km trail takes you closer to the falls for a better view.
There are approximately 18 tent pads at the site, some of which are creekside with mountain views, while others are situated amongst trees. The tent pads are framed with mostly a soil ground. Amenities include: outhouses, a cooking area with benches and bear lockers. Two creeks provide excellent water access.


Tumbling Creek Campground
The campground lies just over 12km from Helmet Falls Campground via Rockwall Pass or just over 10km from Paint Pots Trailhead via Tumbling Creek Trail. It sits in a tucked away forested area along Tumbling Creek, with some open areas offering views of Tumbling Glacier.
The campground feels larger and more spacious than the others along the Rockwall Trail. There are two areas to the campground where the tent pads are clustered. This can be slightly confusing when you arrive as not all tent pads are in an obvious area. If you are arriving from Helmet Falls/Rockwall Pass direction, you’ll arrive at the first section of the campground where tent pads are located amongst trees. If you continue walking, you’ll then come across the second area which is more open and spacious and has tent pads located down various side trails. These sit in more open, grassy areas. Each of the two sections has a cooking and food storage area, with benches and bear lockers. Tumbling Creek can be used for water. Outhouses can be found around the campground.

Numa Creek Campground
The campground lies just under 8km from Tumbling Creek Campground. It can also be accessed via the 6.4km Numa Falls Trail. It is set within a forested valley beside Numa Creek and a smaller stream making it a tranquil spot to relax or take a dip on a hot day.
The cooking area and tent pads are on opposite sides of the creek, requiring an unbridged crossing (there are rocks to balance on to try and stay dry). There are approximately 18 tent pads in a relatively forested area and quite close together. Some have very good vantage points overlooking the creeks. The vegetation amongst the tent pads was quite overgrown (likely because we visited in early season). There are outhouses, bear lockers and picnic tables in the cooking area and water can be accessed from the creeks.


Floe Lake Campground
The campground lies just over 9km from Numa Creek Campground or 10.5km from the Floe Lake Trailhead. It has stunning views of the lake and surrounding mountains.
There are gravel tent pads, some of which have unobstructed lake views. Amenities include: outhouses, a cooking area with picnic tables and bear lockers. Campers can draw water directly from the lake.
Things to note about this campground:
- It is not open until around the 2nd week in July
- It is very popular so it can be difficult to make a reservation
- Mosquitoes can be terrible here in early summer.
Recommended itineraries for the Rockwall Trail
The Rockwall Trail is typically completed over 3 or 4 nights. 4 nights allows for shorter days with fewer km’s to cover, while 3 nights requires one long, demanding day with lots of elevation gain and around 20km to cover.
Many people opt to stay at Floe Lake Campground as it is so beautiful and to catch the lake and sunset or sunrise. Itinerary options 1 and 3 below include a night at Floe Lake Campground, but if you’re unsuccessful at reserving a spot here, your best option is to go with option 2.
There’s no right or wrong itinerary and you won’t miss out on seeing anything with any of these itineraries. It’s really down to how many nights you want to do and, more likely, which campgrounds are available to reserve. We went with option 2 as Floe Lake Campground wasn’t open yet when we did the trail in early July.
For all the itineraries, we recommend starting at Paint Pots and ending at Floe Lake as this requires less elevation gain on the first day and you can spend your last day with a big reward, that being Floe Lake.
We’ve outlined the itinerary options below and included a quick reference table which you can use when making the reservations.
Option 1:
3 nights, 4 days
Night 1: Helmet Falls > Night 2: Numa Creek > Night 3: Floe Lake
- Day 1: Paint Pots Trailhead to Helmet Falls Campground (approx. 14.2km, approx. 355 elevation gain)
- Day 2: Helmet Falls Campground to Numa Creek Campground (approx. 20.2km, approx 1,027m elevation gain)
- Day 3: Numa Creek Campground to Floe Lake Campground (approx. 9.2km, approx. 815m elevation gain)
- Day 4: Floe Lake Campground to Floe Lake Trailhead (10.5km, approx 693m elevation loss)
Option 2:
3 nights, 4 days
Night 1: Helmet Falls > Night 2: Tumbling Creek > Night 3: Numa Creek
- Day 1: Paint Pots Trailhead to Helmet Falls campground (approx. 14.2km, approx. 355m elevation gain)
- Day 2: Helmet Falls Campground to Tumbling Creek Campground (approx. 12.3 km, approx. 719m elevation gain)
- Day 3: Tumbling Creek Campground to Numa Creek Campground (approx. 7.9 km, approx. 393m elevation gain)
- Day 4: Numa Creek Campground to Floe Lake Trail Head (approx. 19.7km, approx. 815m elevation gain)
Option 3:
4 nights, 5 days
Night 1: Helmet Falls > Night 2: Tumbling Creek > Night 2: Numa Creek > Night 4: Floe Lake
- Day 1: Paint Pots Trailhead to Helmet Falls Campground (approx. 14.2km, approx. 355m elevation gain)
- Day 2: Helmet Falls Campground to Tumbling Creek Campground (approx. 12.3 km, approx. 719m elevation gain)
- Day 3: Tumbling Creek Campground to Numa Creek Campground (approx. 7.9 km, approx 393m elevation gain)
- Day 4: Numa Creek Campground to Floe Lake Campground (approx. 9.2km, approx. 815m elevation gain)
- Day 5: Floe Lake Campground to Floe Lake Trailhead (approx. 10.5km, approx 693m elevation loss)
Quick reference table:
| Number of nights & days | Campgrounds (N1 = night 1) |
|---|---|
| 3 nights, 4 days (Option 1) |
N1: Helmet Falls N2: Numa Creek N3: Floe Lake |
| 3 nights, 4 days (Option 2) |
N1: Helmet Falls N2: Tumbling Creek N3: Numa Creek |
| 4 nights, 5 days (Option 3) |
N1: Helmet Falls N2: Tumbling Creek N3: Numa Creek N4: Floe Lake |

How to get a permit for the Rockwall Trail
Since the Rockwall Trail is located in a national park, you will be required to obtain a backcountry permit to stay at the campground. This permit acts as as your reservation spot for the campgrounds. You’ll need to make a reservation for each night of your itinerary, and they must be consecutive dates.
As the trail is popular, reservations can go quickly which may mean you might miss out on the campground you want to stay at, which could in turn impact your itinerary.
For example let’s say you want to do the trail over 3 nights at the beginning of August. You may aim to book the first night at Helmet Falls on August 1st, second night at Numa Creek on August 2nd and third night at Floe Lake on August 3rd (itinerary option 1 above). However, when you come to book you may find that one of the campsites is sold out for one of your nights, e.g. Floe Lake is unavailable to book. This will then require you to change the itinerary you had planned and opt instead to stay the first night at Helemet Falls, the second night at Tumbling Creek and the third night at Numa Creek (itinerary option 2 above).
How to reserve:
RESERVATIONS OPEN ON MONDAY, JANUARY 26 2026 AT 8:00AM MST.
To get a backcountry permit, you can either get it online or by calling Parks Canada:
- Online: Parks Canada Reservation System.
- By phone: 1-877-RESERVE (1-877-737-3783)
It can be highly competitive to get a permit so to increase your chances make sure you:
- Decide on your first choice itinerary and know which campgrounds you want to stay at before launch day.
- Create a Parks Canada account before launch day.
- Sign in to your account before 8am on launch day.
These steps will save you critical time on launch day, which could mean whether you get a permit or not.
What can you do if you don’t get a permit?
If you miss out on a permit, you still have several strategies and alternatives to increase your chances of going.
1. Keep checking for cancellations
Daily monitoring: People frequently cancel or modify reservations, and those freed-up spots get returned to the Parks Canada booking system. Hikers report getting permits hours or days after initial sell-outs by checking regularly.
2. Be flexible with dates or campsites
Broaden your date range: If you can shift your start/end dates by even a day or two, you’ll often find availability that wasn’t there for your original plan.
Alternate campsite combinations: As mentioned above, it’s important to be flexible with your itinerary. If your preferred campsites are fully booked, check the other campsites.
3. Try calling Parks Canada
You can book backcountry campsites by phone through the Parks Canada Reservation Service (1-877-737-3783) if online slots appear gone. Sometimes phone agents can help confirm availability or suggest alternatives.
4. Join community groups and networks
Facebook groups and local hiking forums (e.g., Rockwall Trail Planning groups) are places where hikers might share unused spots when their plans change. Keeping checking these sites.
5. Consider partial trips or day hikes
Consider day hikes from trailheads (e.g., Floe Lake). Day trips usually only require a regular park pass.
Book short overnight trips, either one or two nights to enjoy sections of the Rockwall Trail that may still have permit availability.
Logistics and planning tips
Transportation between trail heads:
Because the Rockwall Trail is a point-to-point hike, you’ll need to plan how to get between the two trail heads (Paint Pots and Floe Lake) which are 13km apart. Common options include:
- Arrange pickup. If you know someone locally you could arrange for them to shuttle you.
- Option 1: Park at Floe Lake Trailhead and have them drive you to Paint Pots on Day 1.
- Option 2: Park at Paint Pots and have them pick you up at Floe Lake on the final day.
- Option 3: Have them both drop you off and pick you up so you don’t need your car at either trailhead.
- Hitchhike. Hitchhiking between the two trailheads is common. It’s what we did. We recommend doing this on the first day.
- Park at Floe Lake Trailhead, walk out to the highway and hitchhike north to Paint Pots.
- Be prepared for cars to pass you by; we waited around 15 minutes before someone stopped.
- Some hikers use a simple cardboard sign (“Paint Pots – 13 km”) to increase their chances.
- Bike. You can stash a bike at one of the trailheads and cycle between them. Many hikers choose this option, but keep in mind that while bikes are often left untouched, security is not guaranteed.
Trail conditions:
Expect snow patches, fallen trees and creek crossings. Always check the latest trail condition reports from the park. As we were hiking the trail in early July we were worried that we wouldn’t be able to do the whole trail as the passes would be covered by snow. Parks Canada seems to update trail conditions every week, so we kept checking that close to the date. We also checked the Facebook page to see what other hikers had encountered on the route.
Trail navigation:
The trail is well trodden and easy to navigate, even where there are snow patches. There are clear signposts at junctions and marker poles along the passes. Even though it’s easy, we still recommend downloading the trail on All Trails before starting the hike, just in case you want reassurance that you’re on the right track.
Water access:
It’s not practical or necessary to carry all your water for the trip. Bring a water filter and top up from creeks and rivers along the route. Every campground is located next to a reliable water source. The only section with limited water access is between Floe Lake and the Floe Lake Trailhead, so make sure you fill up when you can.
Weather:
Expect rapidly changing and unexpected weather. We checked several forecasts before we left for the hike, none of which turned out all that accurate. We had all sorts of conditions over the 4 days we hiked the trail in early July. Two of the days were exceptionally hot and sunny, the other two were a mixed bag. One morning started off sunny, then the clouds, rain and strong winds rolled in. Temperatures can drop significantly along the passes.
Wildlife safety:
This is bear country (black and grizzly). Carry bear spray, make noise and use food lockers at the campgrounds. While we didn’t encounter any bears, we saw a whole lot of bear scat along the trail, particularly between Paint Pots and Helmet Falls and Numa Creek to Floe Lake.
Mosquitoes:
Mosquitoes can be particularly bad in July and August. During the day we didn’t notice them too much, with the exception of Floe Lake, but they came out in hoards as the sun began to set. Once you reach the meadows before Floe Lake, this is when they really got bad and all around the lake itself. Bring bug spray and a head net.
Limited cell service:
Tell someone your itinerary and expected return date. If possible, send a satellite message each day to confirm you’re safe. Newer iPhones offer satellite messaging, which is helpful in emergencies.
Leaving belongings in your car:
If you’re leaving your car at either trailhead, avoid leaving valuables inside. Break-ins are rare, but they do happen, so it’s best not to tempt opportunistic thieves.
Packing list for the Rockwall Trail
Here’s a comprehensive list of everything we brought on the Rockwall Trail. Although it seems like a long list, we brought as little as possible to keep our bags lightweight. Essentials only.
General equipment:
- Backpack
- Rain cover for backpack
- Tent
- Sleeping mat
- Sleeping bag or quilt
- Sleeping bag liner (optional)
- Pillow
- Quick dry towel
- Hiking poles
- Micro spikes (optional). Even though we knew there was some snow on the trail, we decided not to bring micro spikes to save space and weight. We were fine without them.
- Headlamp
- Lamp
- Water reservoir and water bottle
- Water filtration
- Pen knife
- Zip lock bags to use for garbage, used toilet paper, etc. (do not leave anything on the trail or at campgrounds)
- Bin bag to line the inside of your bag for double waterproofing
- Phone
- Portable charger to charge phone
- Camera and camera batteries (optional)
- First aid kit including medicine
- Whistle
- Bear spray
- Bug spray
- Bug head net
- Cash, card, id
- Ear plugs (optional)
- Eye mask (optional)
Cooking equipment:
- Stove
- Fuel canister/gas
- Matches or lighter
- Cookset and cutlery
- Biodegradable dish soap
- Sponge or brush to clean cooking equipment
- Microfibre towel to dry cooking equipment
- Dry bag to carry food and store it in bear locker
Food and water:
- Carry 2 litres of water (fill up along the trail at rivers/creeks using water filter)
- 3 x breakfast (we pre-made bags of oats, chocolate chips, cranberries and banana chips)
- 3 x lunch (we brought cheese, avocado, cucumber and wraps)
- 3 x dinner (we brought spaghetti and dried tomato soup for sauce for 2 dinners, and a dehydrated meal for 1 dinner)
- Snacks (dried fruit and nuts, chocolate, etc.)
Clothes:
- Rain coat
- Waterproof trousers
- Light down jacket
- Hiking trousers
- Leggings
- Shorts
- Vest
- T-shirts x 2
- Light fleece
- PJs
- Sleeping socks
- Underwear x 4
- Hiking socks x 3
- Gloves
- Cap
- Beanie
- Hiking shoes/boots
- Camp shoes e.g. Crocs
Toiletries:
- Toothbrush
- Toothpaste
- Hand sanitizer
- Toilet paper
- Suncream
Leave in car for end of hike:
- Spare clothes
- Water
- Snacks
Our thoughts on the Rockwall Trail
This is an absolutely stunning multi-day hike. The campgrounds are beautiful, the views are incredible and you get to see and experience everything that encapsulates the Canadian Rockies: turquoise coloured rivers and lakes, dramatic mountains, spectacular glaciers, pretty alpine meadows, beautiful forests and wildlife.
At the same time, it is an absolutely challenging hike with a lot of elevation gain, rivers and creeks to navigate, overgrown brush to make your way through, snow patches and snow bridges to cover and unpredictable weather. Mentally preparing for the ascents especially on the last day to Floe Lake helped. If I had to do the ascent to Floe Lake on the first day carrying all my gear plus 3 days worth of food, I don’t think I would have made it, I definitely wouldn’t have enjoyed it. While it is definitely a challenge, we think this adds to its appeal.
The one downside to the hike that we think is worth mentioning just so you know what to expect, is that you do pass through a lot of forested areas with no views. We mention this because pretty much the entire first day from Paint Pots to Helmet Falls is through forest and you really can’t see much else except for a couple of glimpses of surrounding mountains. Of course, the views along other sections of the trail make up for it, but it’s good to know that you’ll be spending a day amongst the trees.
We loved the dramatic scenery and also the sense of remoteness. We think there were only 5 groups hiking the trail in the same direction on the exact same dates. On our first day we didn’t pass a single person and at Helmet Falls campground it was just the 5 groups. Throughout the rest of the trip we only crossed paths with a few other people coming in the opposite direction, and there were a few more groups at the other campgrounds. Floe Lake also had some day-trippers.
All in all it felt like a real backcountry adventure and we would definitely do it again.
Rockwall Trail hike FAQs
We’ve put together a few FAQs to help with planning.
- How long is the Rockwall Trail?
- The full route is about 54–55 km (34 miles) one-way.
- What is the elevation gain of the Rockwall Trail?
- Approximately 3,400 m total gain / 3,500 m loss over the full route, depending on direction.
- When can you make campground reservations?
- Rockwall Trail campground reservations open on Monday, January 26 2026 at 8:00 a.m. MST.
- How can I get a backcountry permit for the campgrounds?
- Everything you need to know about securing a permit can be found here.
- Which is the best starting and ending point?
- We recommend starting at Paint Pots and ending at Floe Lake to avoid having a huge elevation gain in the first day up to Floe Lake.
- When is the best time to backpack the Rockwall Trail?
- Mid-July to early October is generally considered the best time to hike the trail as snow can cover the alpine passes well into July and then again from October.
- Do I need to bring a bear resistant food canister or bag?
- You do not need to bring a bear resistant food canister or bag as each campground has lockers to store your food.
If you have any other questions about planning this trip, feel free to drop a comment below. We’d love to help you craft the perfect itinerary.